Blog

  • Tiller Router: Self-Hosted LLM Router with Model Fallback

    I’ve been doing a lot of experimenting with AI agents and coding tools lately, and one of the recurring frustrations has been managing which AI models they use.

    Between OpenCode, Hermes Agent and various other tools, I’ve accumulated a fair collection of API keys across different LLM providers. Some offer inexpensive models, others have generous free tiers, and some are better suited to particular tasks.

    The problem is that every tool seems to have its own way of configuring models. Some have a nice model picker, others require configuration files, and some make changing models unnecessarily difficult.

    Then there’s the problem of providers running out of credits, hitting rate limits or simply being unavailable.

    None of these are particularly difficult problems individually, but when you’re regularly switching between models and providers, it gets old fast.

    So I’ve built Tiller Router, a free, open-source, self-hosted LLM router that sits between your AI tools and your model providers.

    GitHub: https://github.com/dellarb/tiller-router

    One place to manage your models

    The basic idea is pretty straightforward.

    Instead of configuring all your provider credentials and preferred models in every application, you point your AI tools at Tiller Router.

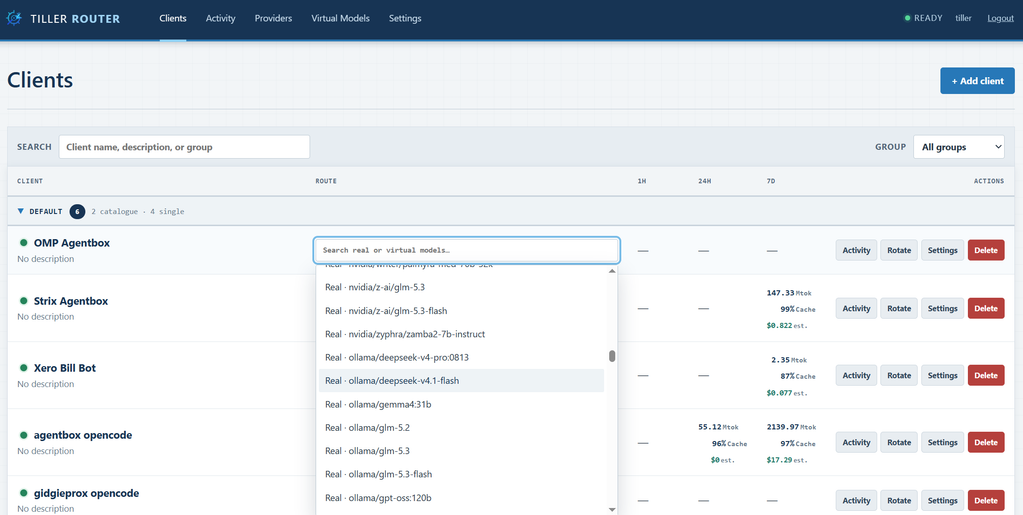
    You add your providers and API keys once, then use Tiller’s web interface to decide which models each application should use.

    The clever bit is that you can change the model being served to an application without having to touch the application’s configuration.

    For example, I can have OpenCode configured to use Tiller with a single API key. Through Tiller’s interface, I can switch that client between a DeepSeek model, GLM or something from OpenRouter.

    OpenCode doesn’t need to know anything has changed. Its next request simply goes to whichever model I’ve selected.

    This is particularly useful when experimenting with different models or trying to make better use of the various free and inexpensive API offerings.
    One model, or a whole catalogue

    Tiller supports two different ways of providing models to clients.

    Single model mode is my favourite. Give an application one API key and Tiller will serve whichever model you’ve selected for it, regardless of the model the application actually requests.

    That means you can effectively take control of model selection away from the application entirely. Useful for agents, coding tools and applications with clunky model configuration.

    Catalogue mode works more like a traditional LLM gateway. You choose which models a particular API key can access, and Tiller exposes those through its model list endpoint.

    This is handy when you still want to select models within an application, but don’t want to scroll through hundreds of models you’ll never use.

    Virtual models and automatic fallback

    This was the other big reason I wanted to build Tiller.

    There’s some excellent value available through free and low-cost LLM providers, but the catch is that they’re not always reliable. Rate limits, timeouts and provider outages can bring an agent to a halt halfway through a task.

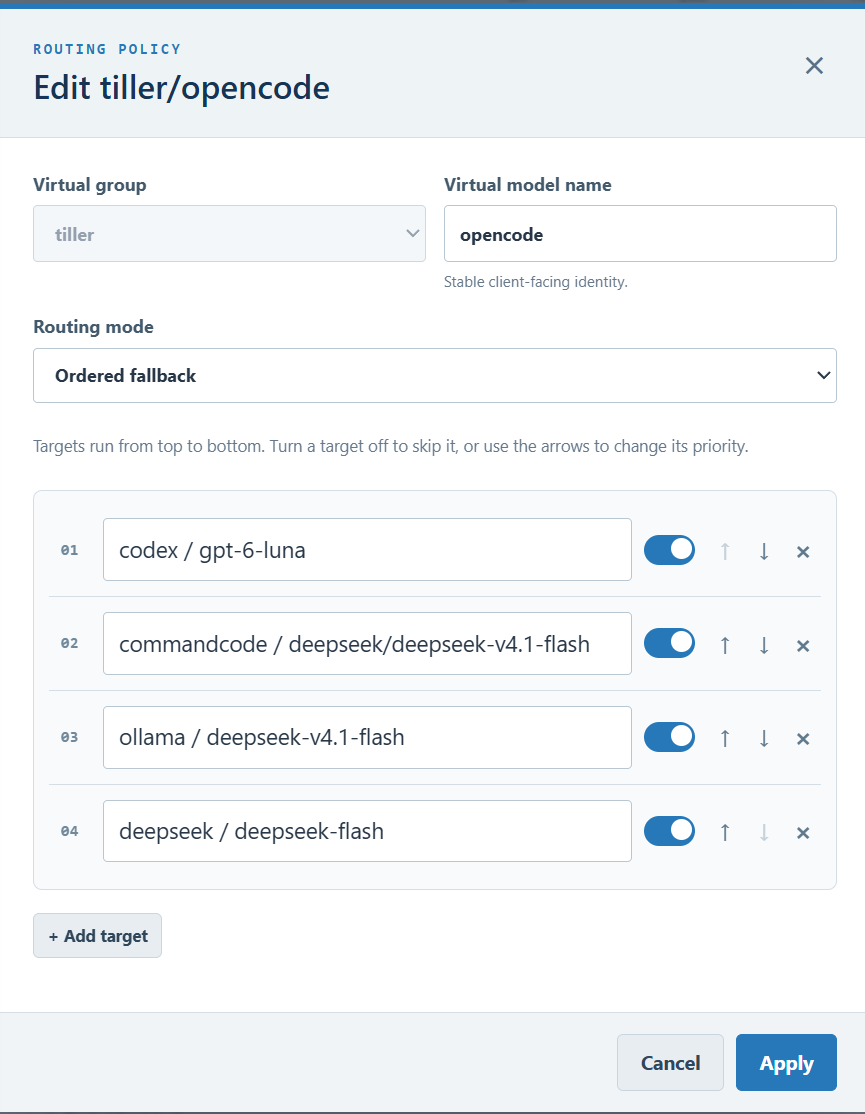
    Tiller lets you create virtual models which can be backed by multiple real models in a priority order.

    For example, I might create a virtual model called coding configured as follows:

    1. GLM via Z.ai
    2. DeepSeek
    3. Claude via OpenRouter

    My coding agent only sees the coding model.

    If the first provider fails or times out, Tiller can automatically try the next provider in the list. This happens without needing to change anything in the agent.

    There are some sensible limitations here. Once a model has started streaming a response back to the client, Tiller can’t transparently replace it halfway through. Fallback is designed to handle failures before the response has begun.

    You can also assign a virtual model to a single-model client, combining both features.
    A proper web interface

    I’ve tried to keep the interface focused on the things I actually want to do regularly.

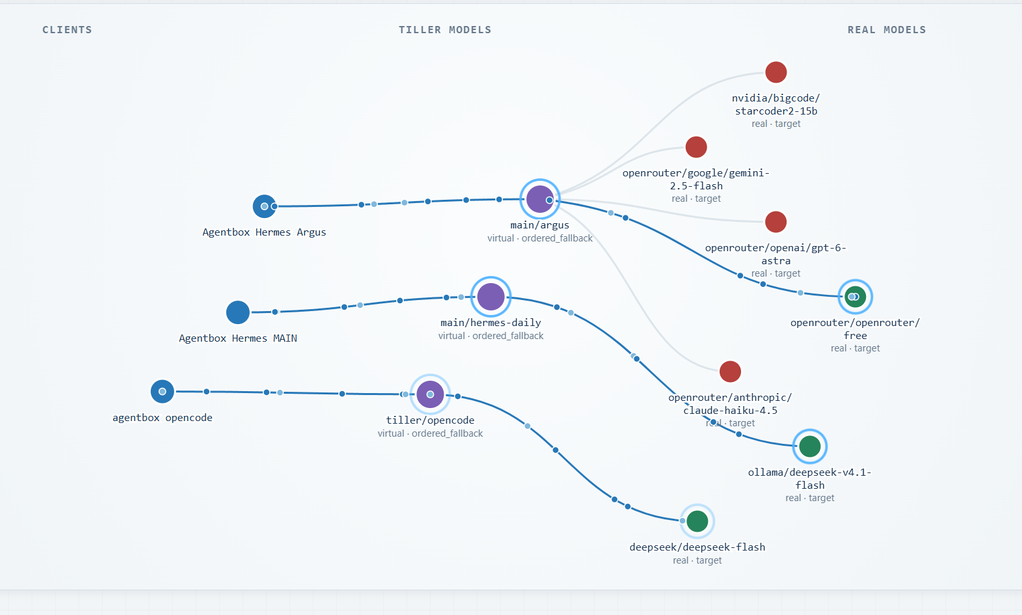
    You can add providers, manage API keys, browse available models, configure virtual models and steer your connected clients from the one interface.

    There’s also an activity view showing which clients are making requests, which models and providers are being used, response times, token usage and when a fallback has occurred.

    I find this particularly helpful when an agent has been running for a while and I want to see what it’s actually been doing.

    Getting it running

    Tiller is designed to be self-hosted and runs as a single Docker container with persistent data stored in a local directory.

    If you’ve already got Docker running, it’s a fairly simple setup.

    Create a directory and add the following docker-compose.yml:

    services:
      tiller-router:
        image: ghcr.io/dellarb/tiller-router:latest
        container_name: tiller-router
        ports:
          - "8080:8080"
        volumes:
          - ./data:/data
        restart: unless-stopped

    Start it with:

    docker compose up -d

    Then open http://localhost:8080 and follow the initial setup to create your administrator account.

    From there, add your LLM providers, create a client API key and point your preferred AI tool at Tiller.

    For access outside your local network, I’d recommend putting it behind an HTTPS reverse proxy and following the repository’s configuration guidance.

    The source code and full installation instructions are on GitHub.

    Does the world need another LLM router?

    Probably not!

    There are already some very capable LLM gateways available, particularly if you need sophisticated routing rules, load balancing or enterprise-level features.

    But I kept finding that the thing I really wanted was much simpler.

    I wanted to connect an application once, choose which model it uses from a web interface, and be able to change that model whenever I liked. Ideally with a fallback so a rate-limited provider wouldn’t interrupt whatever I was working on.

    Tiller isn’t trying to automatically work out the smartest or cheapest model for every request. It gives you direct control over that decision.

    It’s also deliberately lightweight, with no need to set up a separate database server or a pile of supporting services.

    Free and open source

    Tiller Router is available on GitHub under the AGPL-3.0 licence.

    It’s currently in public beta, so there will almost certainly be bugs and some rough edges, particularly with the huge variety of LLM providers and clients out there.

    I’ve been building it around my own use cases, but I’m keen to hear whether others find it useful, what clients work well, and where things could be improved.

    If you’re running a collection of AI tools and are tired of constantly fiddling with API keys and model settings, give it a go.

    Source code, Docker installation and issue tracker:
    https://github.com/dellarb/tiller-router

  • The pains of mixed GST Invoices

    If you process invoices for a not-for-profit, community group, or small organisation, you’ve probably run into this: an invoice arrives with a mix of taxable and GST-free items. The supplier has helpfully totalled it all up — one grand total, one GST figure — and left you to work out the individual line amounts yourself.

    Most accounting software, including the popular cloud platforms, wants you to enter bills line by line with each item’s ex-GST amount. That means you need to back-calculate from the totals before you can even start entering the bill. For a single invoice it’s maybe a few minutes of work. When you’re processing a stack of them, it gets old fast.

    The maths isn’t hard — it’s just tedious

    The logic is straightforward enough. The GST amount tells you exactly what was charged on the taxable portion — divide it by 10% and you have the ex-GST value of those items. Subtract that from the invoice’s ex-GST total and you’re left with the GST-free portion. Write it all out once and it’s obvious. Do it for the fifteenth invoice this month and it’s just noise.

    A quick solution

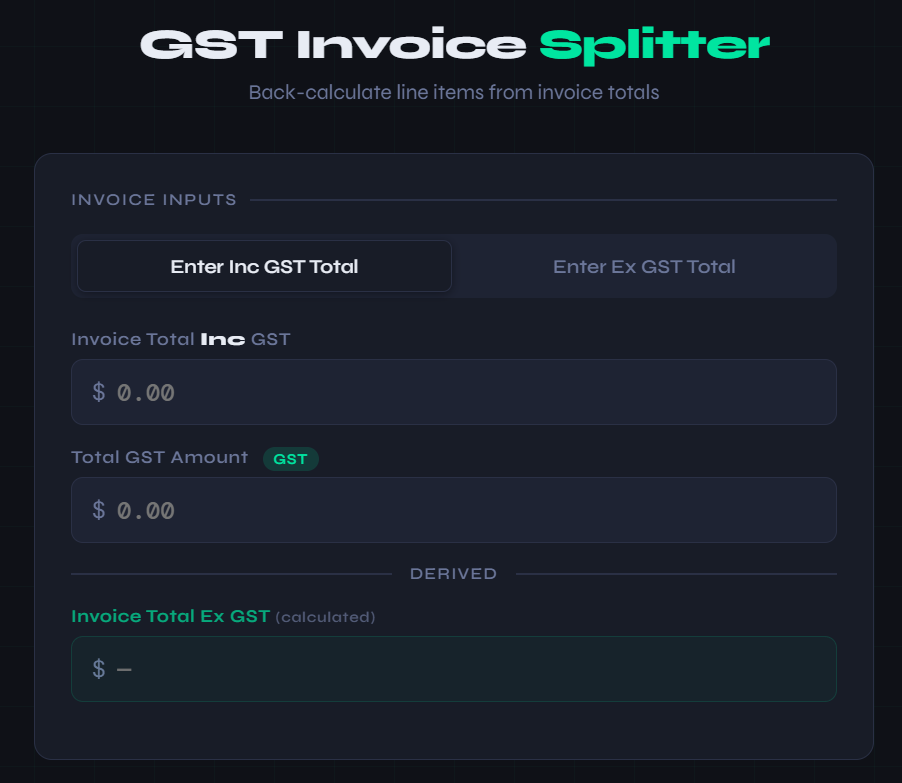
    I put together a simple tool that does this calculation in seconds. Enter the invoice total and the GST amount — either inc or ex GST depending on what your invoice shows — and it spits out the two line items ready to enter. It runs in the browser with no login, no account, nothing to install.

  • Using NFS Volumes on OpenMediaVault with Portainer

    Yep this is another niche tech note after I spend ages figuring it out.

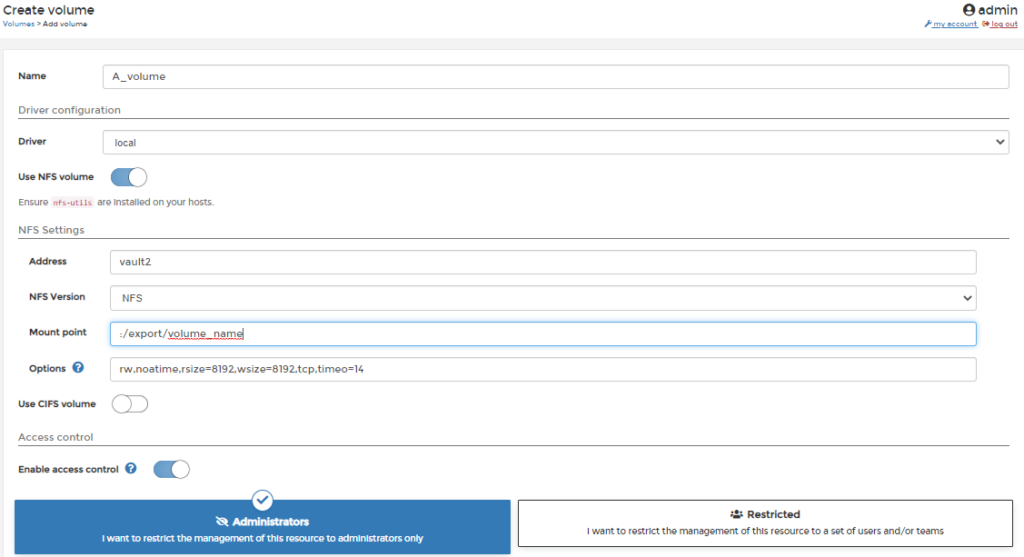
    So I wanted to use an NFS share hosted on OpenMediaVault as a volume for a Docker container running on Portainer. It turns out there are a few default things that need adjusting to make this work and if you don’t get it right it just puts the volume on the local drive.

    To use an NFS share do the following

    1. Name the volume
    2. Select NFS Volume
    3. Enter the hostname
    4. Select NFS instead of NFS4 in the version field
    5. add a colon before /export/sharename so it is :/export/sharename

    That’s it – now you can successfully use the NFS share as docker volume without a pile of errors!

  • Simple Repository Setup for Proxmox

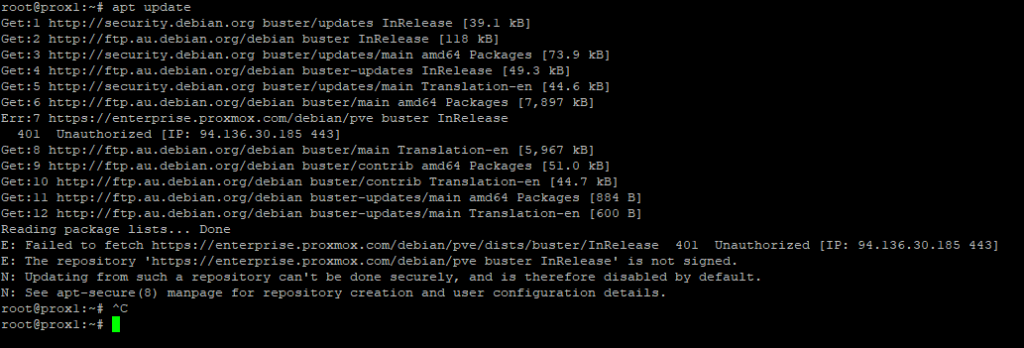
    For those of us using the great OS Proxmox to manage virtualisation one of the first challenges is fixing the default repositories as it will throw errors such as “401 Unauthorised” and “Failed to fetch https://enterprise.proxmox.com/debian/pve/dists/buster/InRelease”

    This is caused by Proxmox shipping with some enterprise repositories switched on by default and is fairly quick and easy to resolve for anyone who wants to use the free repositories for development work. Just follow the below two steps. This is based off an install in August 2019 of Proxmox VE6.0-4.

    Step 1

    Remove the enterprise repository pointer by running “rm /etc/apt/sources.list.d/pve-enterprise.list”

    Step 2

    Edit the main sources list to contain the correct and free repositories which won’t generate any errors. Edit the file /etc/apt/sources.list to match the below content:

    deb http://ftp.au.debian.org/debian buster main contrib
    
    deb http://ftp.au.debian.org/debian buster-updates main contrib
    
    # PVE pve-no-subscription repository provided by proxmox.com,
    # NOT recommended for production use
    deb http://download.proxmox.com/debian/pve buster pve-no-subscription
    
    # security updates
    deb http://security.debian.org buster/updates main contrib

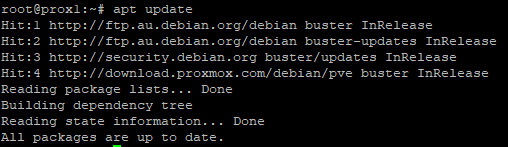
    That’s it! Happy apting.

  • Automatic Software In The Loop (SITL) setup for ArduPilot

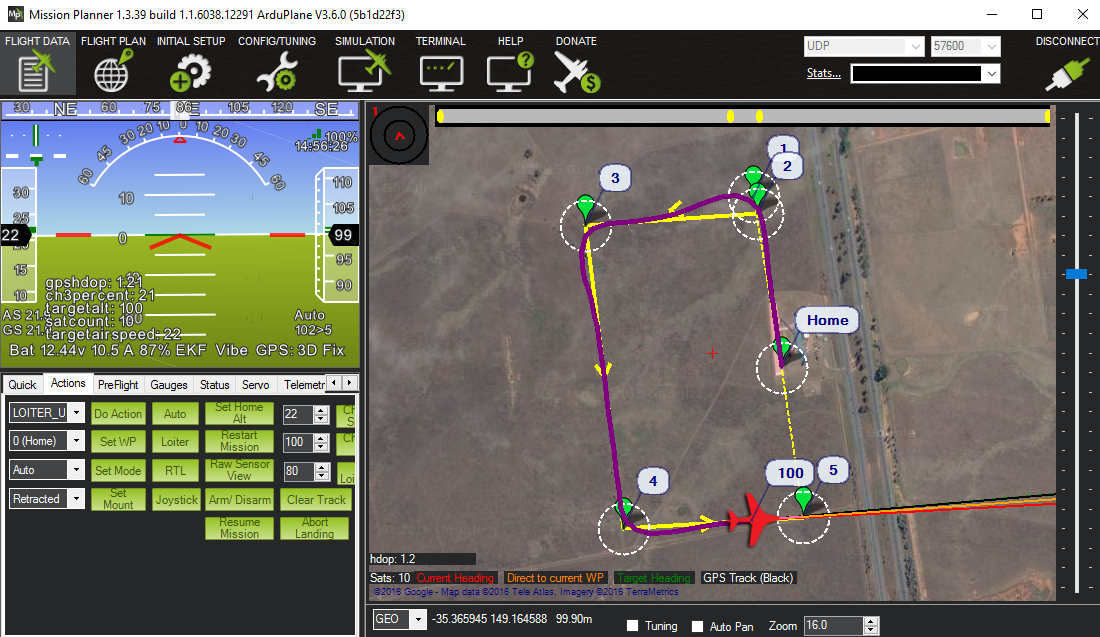
    For those who use and develop using the ArduPilot autopilot software (as featured on DiyDrones and ArduPilot Discourse), a powerful simulation tool is available that can replicate all of the features of the autopilot without flying an actual aircraft. This is extremely useful for testing complex missions or parameter configurations without risking real hardware.

    Flying a simulated ArduPlane UAV around Canberra from the comfort of my desk in Perth.
    Flying a simulated ArduPlane UAV around Canberra from the comfort of my desk in Perth.

    Unfortunately setting it up is a bit tricky, official instructions are available however to make life easier I have created an automatic script that you can run that will install and run the SITL software on a Ubuntu 14.04 Linux PC or virtual machine.

    This software is licensed under GNU General Public License version 3 and the source code is available at https://bitbucket.org/dellarb/ardupilot-sitl

    (more…)

  • Download all attachments from Trello card as a zip file

    **Unfortunately Trello changed their service in a way this no longer functions – I hope it was helpful to people over all this time**

    Trello is amazing tool for co-ordination, planning and collaboration with the ability to assign cards, create due dates and checklists and also attach files. I have often found myself wanting to download all of the files associated with a card but have not found an easy way to do this without manually clicking and downloading on each one.

    To simplify this I’ve created an online attachment downloading tool that you can export your card information to and it will create a single zip file of all attachments on the card:

  • Using OpenVPN on LXC Hosts

    A common problem I encounter is trying to use OpenVPN on Linux containers hosted using LXC. LXC containers are a great, low resource way to virtualise things but need some extra setup for OpenVPN. Typically you get an error that looks something like:

     ERROR: Cannot open TUN/TAP dev /dev/net/tun: No such file or directory

    (more…)

  • Apache as reverse proxy for letsencrypt free https certificates

    Scenario

    You have a single incoming IP address and want to run multiple web servers for multiple sites behind this IP address on your local network. The best way to do this is using a reverse proxy server For example:

    • Your External IP is: 8.8.8.8 with and internal LAN of 10.1.1.X
    • Ports 80 (http) and 443 (https) have been forwarded from your external ip to an internal server at 10.1.1.2 which will handle the reverse proxy and SSL/TLS work using letsencrypt
    • You have other application web servers listening on port 80 on your internal LAN at 10.1.1.11 and 10.1.1.12 but these are not accessible from outside your network.
    • You have subdomain11.yourdomain.com and subdomain12.yourdomain.com both pointed to 8.8.8.8 and you want visitors to them to see the application servers at 10.1.1.11 and 10.1.1.12 respectively.
    • You want to provide secure https access to both subdomains but don’t want to configure this on each of the three servers separately.

    This guide is based on using Apache2 on Ubuntu 16.04, some commands may differ slightly between different flavours of Linux but the core configuration for Apache2 should work on any distribution.

    (more…)

  • Simple set up for Turnigy 9XR (or similar) 6 position mode switching with APM Autopilots – No Hardware/Flashing Required

    Simple set up for Turnigy 9XR (or similar) 6 position mode switching with APM Autopilots – No Hardware/Flashing Required

    This is a cross post for one of my original blog posts on DIY Drones. It is included here for permanent reference.

    T9X_1

    Until recently my main TX was a Turnigy 9X and I (like many others) was using a hacked in 6 position POT switch to select modes on my various aircraft. Unfortunately the 9X has died so has been replaced by a shiny new 9XR. Rather then hack apart the 9XR (too pretty) I wanted to experiment with using the existing controls to select modes on my aircraft. I have seen several tutorials on this but none met all of my requirements below.

    1. Not relying on guessing the position of the continuous POT switches
    2. Gives a easy to read visual indicator of current mode
    3. Uses only a single radio channel
    4. All performed with the default software and hardware – no flashing/hacking required

    The method I used was to combine the 3 position switch (ID0/1/2) with the Aileron Dir switch. Between these two switches there are six possible combinations which neatly matches the 6 modes of the APM ecosystem.

    (more…)

  • Team West Coast UAV in the 2016 Medical Express UAV Challenge

    One of my passions is UAVs or drones of which I’ve built a number. Over the past year I’ve been working with a local team of fellow enthusiasts preparing an entry for the 2016 UAV Medical Express Challenge.

    The competition involves a simulated scenario where teams must send an unmanned, autonomous aircraft a substantial distance (10-30km) away to locate a person who is unwell. Once located, an aircraft must land near the unwell individual and a blood sample will be placed in the aircraft. Next, the aircraft must autonomously take-off and return back to the launch site where that sample would be “tested” to help diagnose and treat the simulated casualty.

    In September 2016 we received a “go” decision from the judges to proceed to Deliverable 2 where we must demonstrate our capability to complete the challenge. We submitted this yesterday and from here the judges will short-list the 20 teams that will get to attempt Deliverable 3 and enter the competition.

    Our team blog contains the full details from Deliverable 2 including the written report and the accompanying video is below:

    This challenge is an exciting opportunity to demonstrate the abilities of technology for doing good in our world. The fact we can develop this on tiny budgets with a DIY approach is a real testament to the amazing world we all live in.